Welcome!
This guide was created by Criefaux.
He is not an expert and does not claim to be. This guide was created with a basic caveman level of knowledge in hopes of helping other cavemen make fire.
If you find an error please reach out to him. If you can’t get the guide to work, try again. If you think you can make a better version of this guide, please do!
Caw.
[ Cover art by IceCat ]
Table of Contents
1. Quick Start Guides
Note: You should not go through each guide. Pick which guide you want and follow those instructions.
Guides:
This will get you making calls and doing a show, but is limited
Pros: anyone can do and understand this setup
Cons: no guests, the person you call will not hear music/soundboards
This is the do-it-all setup using Voicemeeter Potato
Pros: you can use soundboards and have guests
Cons: this can be confusing to set up
What you need:
Note about Skype: This guide was started in early 2025 before Skype announced that it was shutting down. The instructions will still work, but you will not be able to use Skype as your call machine.
RIP Skype.
A) The Quick and Dirty
So you want to make calls and do a show, but you are bad with computer machines or you just want to get your feet wet trying it out? This is the setup for you!
While this setup will not allow you to have guests using other apps (Discord, mumble, etc), you can still have guests if you call them using your call machine (Skype for example). The downside being that your guest will sound like they are on the phone (their audio will not be great).
This (or very similar) setup has been used by many successful prank callers for years!
Okay, I’ll shut up now and show you how.
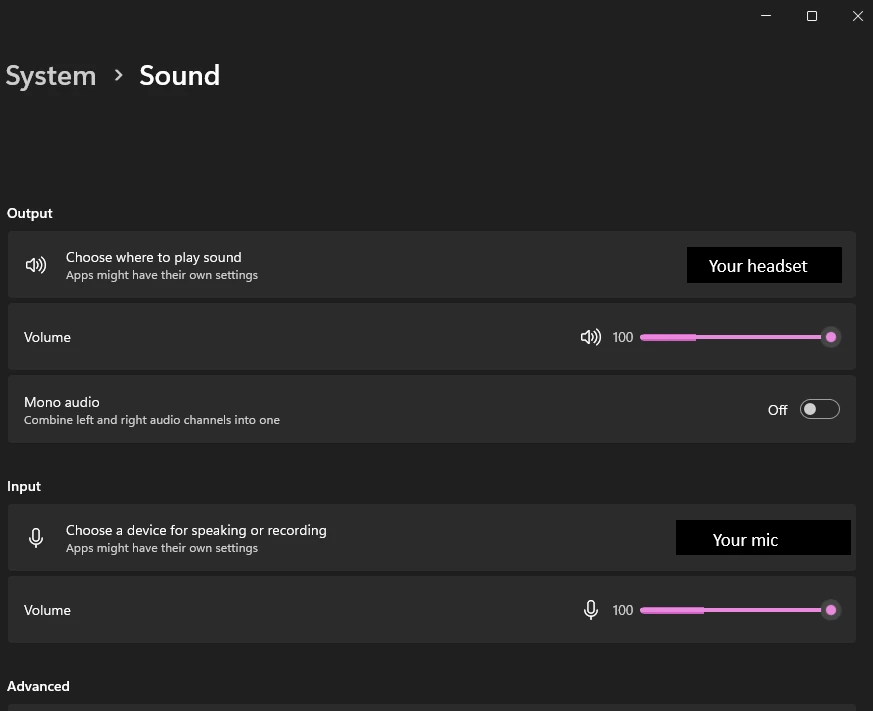
1) Set your Windows default output to be your headset and the default input to be your mic. (the examples will be using Win11)
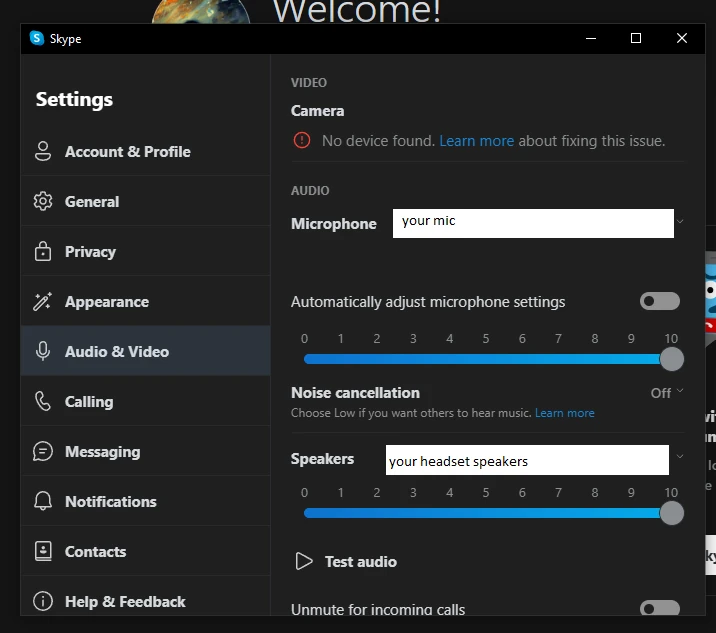
2) In your call machine, set your microphone as your mic and your speakers as your headset:
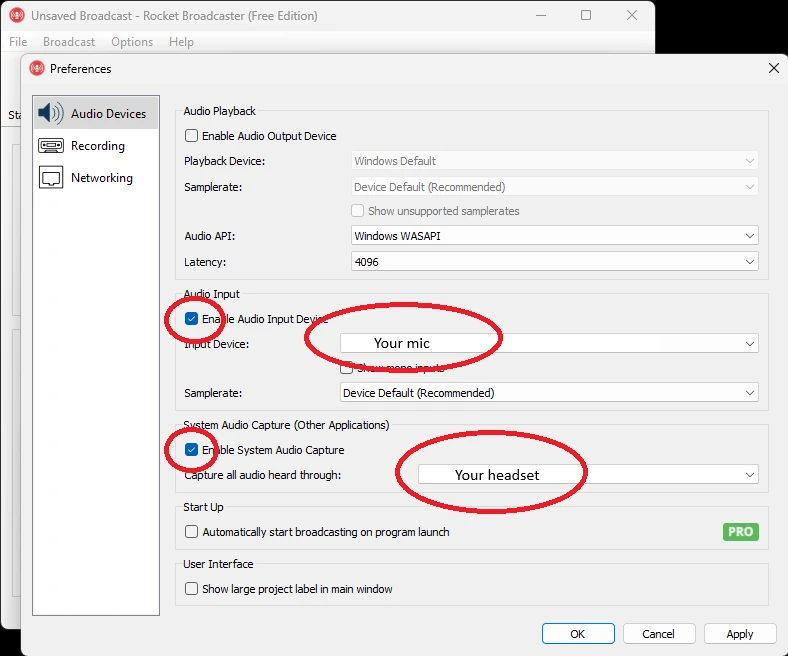
3) In your stream machine, set your Input as your mic and your system sounds as your headset (or windows default):
Note: If using Rocket Broadcaster, make sure to check the two boxes that are circled
That’s it!
B) The Full Dirty
Note: This quick guide will not teach you how to use Voicemeeter, but if you follow ALL of the instructions, you will have a working configuration.
YOU MUST FOLLOW ALL OF THE STEPS
1) Download and install Voicemeeter Potato
2) Set all of your relevant inputs/outputs to the correct format
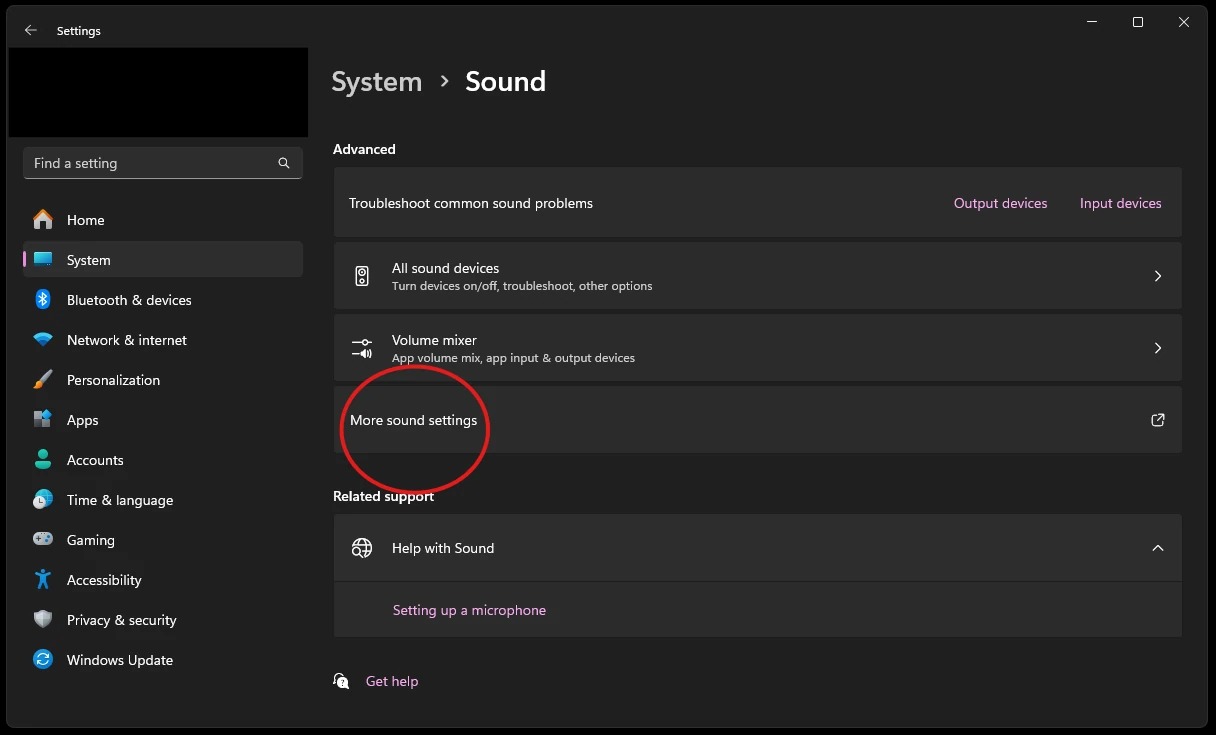
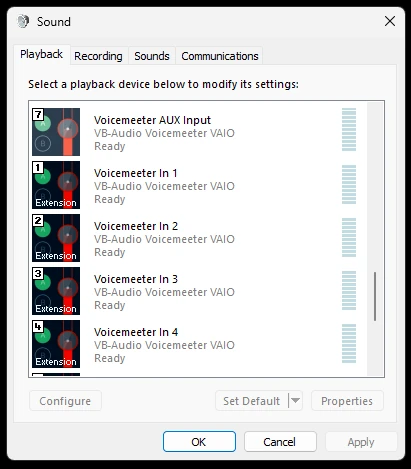
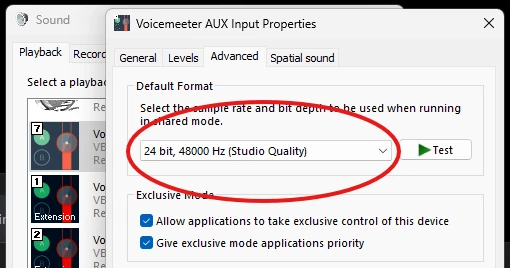
Note: If you do not do this for ALL of the options, you will be plagued with bad audio for years to come
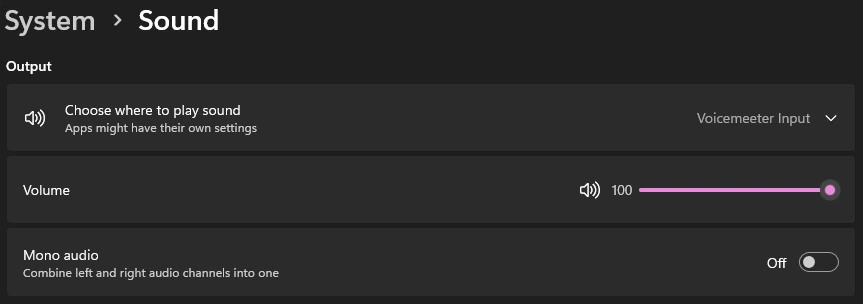
3) Set your Windows default Output to ‘Voicemeeter Input’
4) Set your Windows default Input to ‘Voicemeeter Out B3’
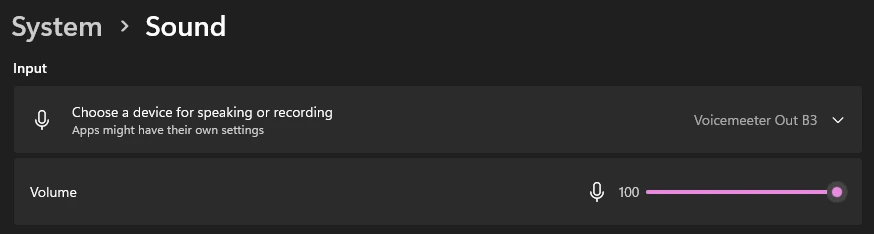
Note: I have labels on my voicemeeter setup, yours will not, so my images will look slightly different than what you will see (how to label your board is covered in the Voicemeeter Tips section).
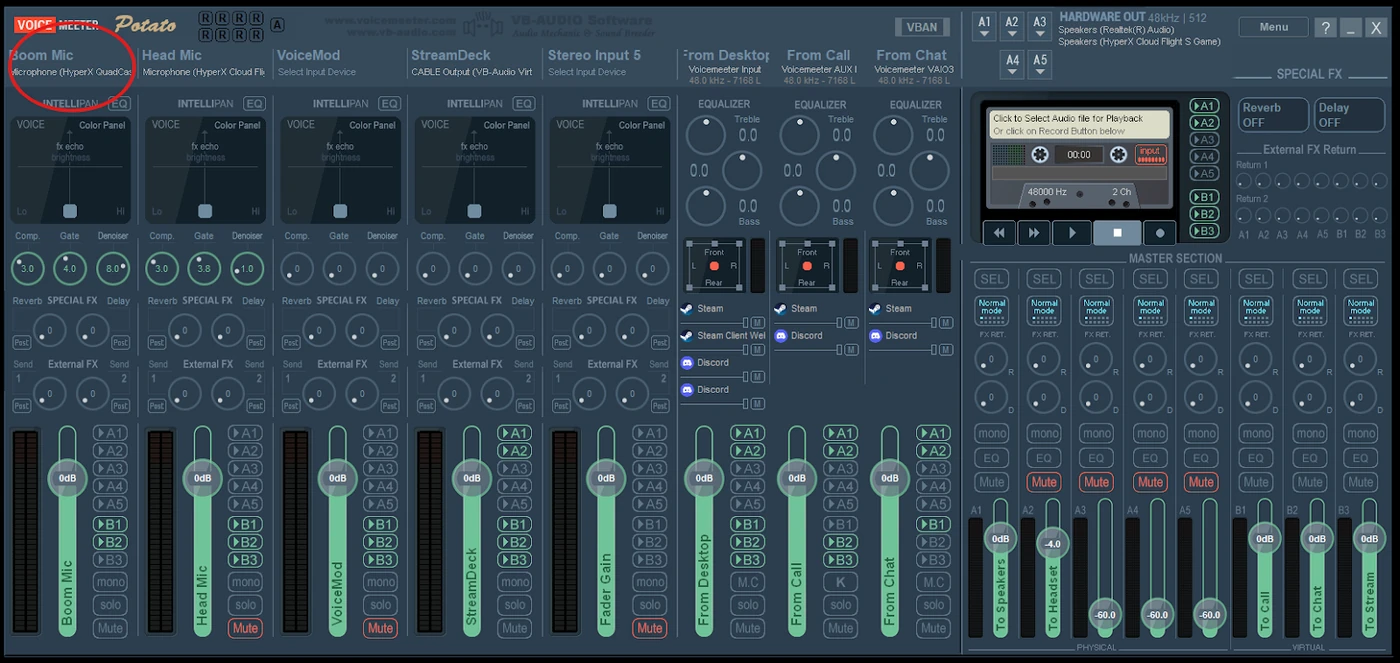
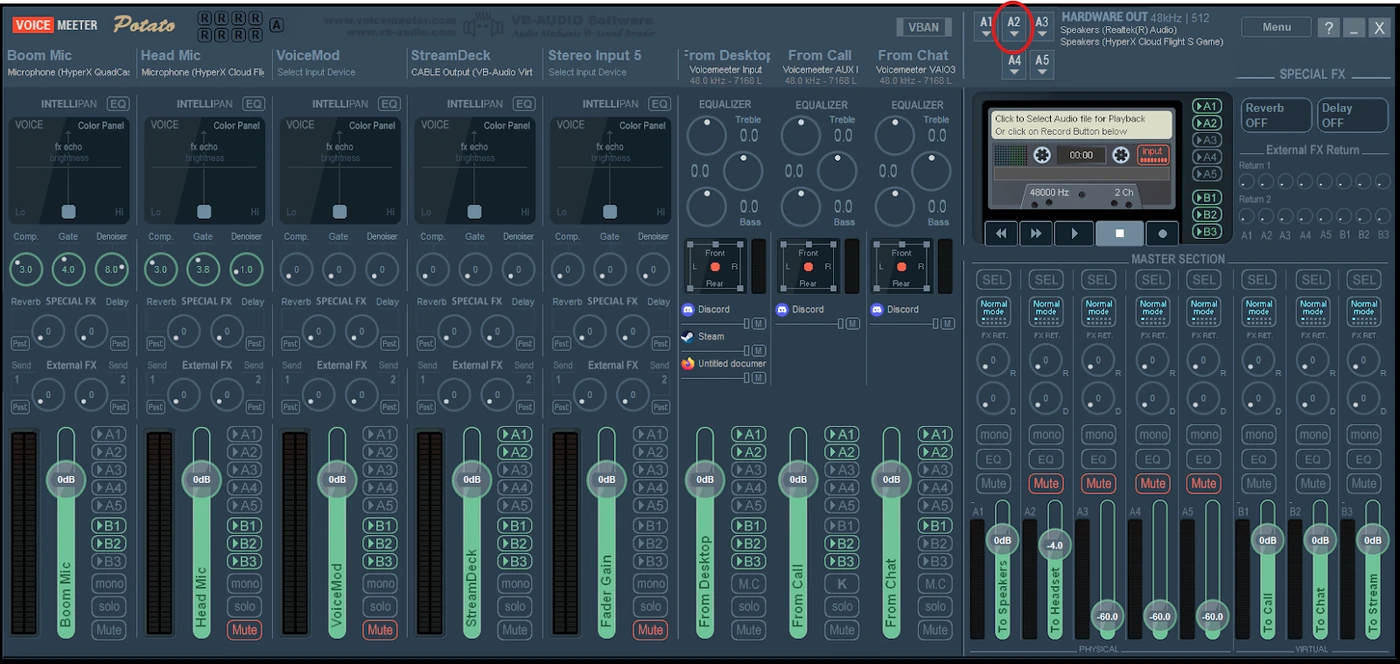
5) Set your mic as the first Input in Voicemeeter: (click the label circled in red)
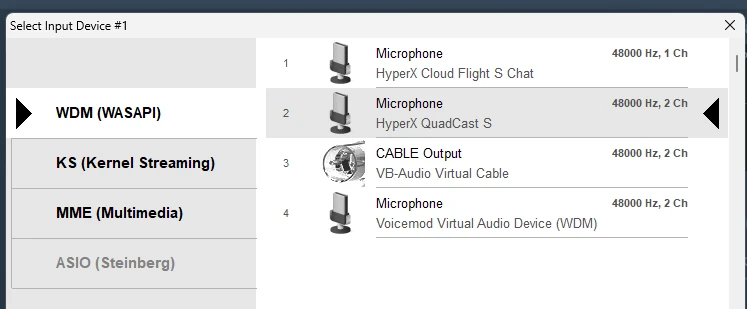
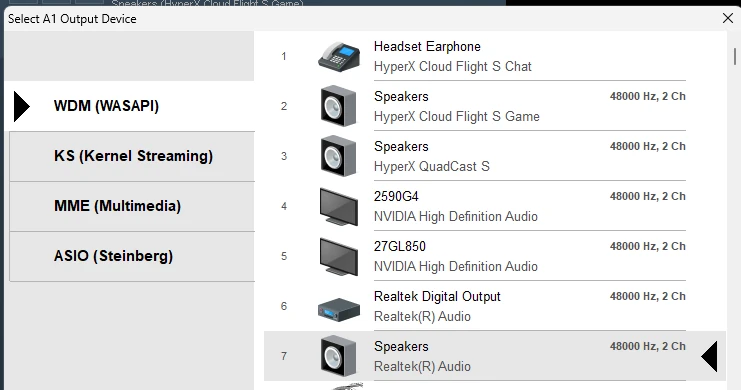
6) Set your computer speakers to be the first Output in Voicemeeter:
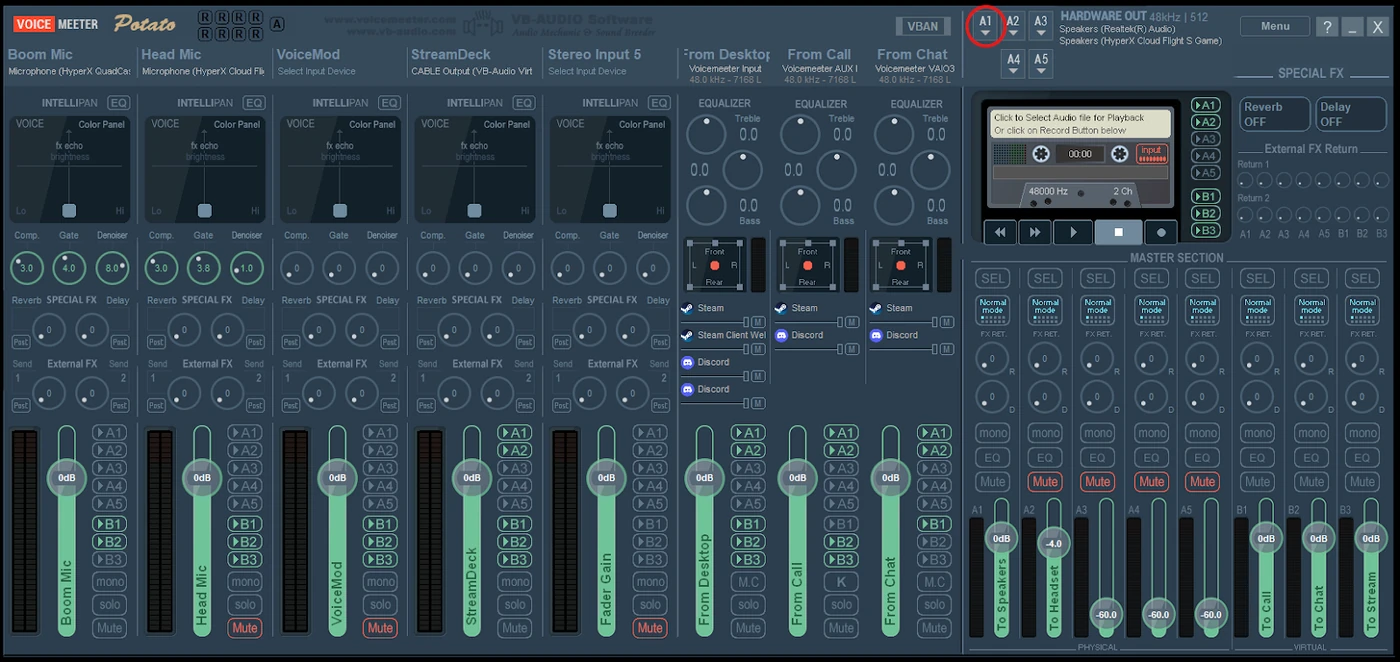
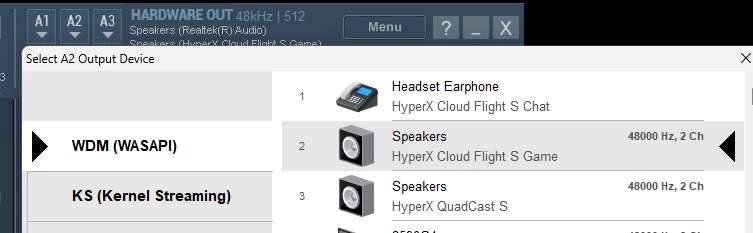
7) Set your headset to be the second Output in Voicemeeter:
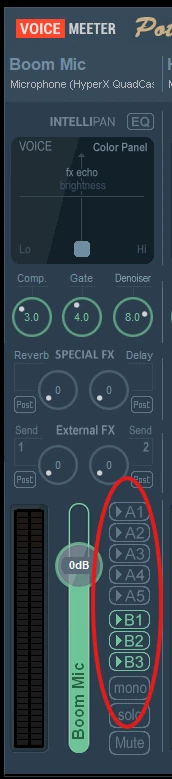
8) On Voicemeeter set your A1-B3 buttons like this for your mic:
9) On Voicemeeter set your digital Input A1-B3 buttons like this:
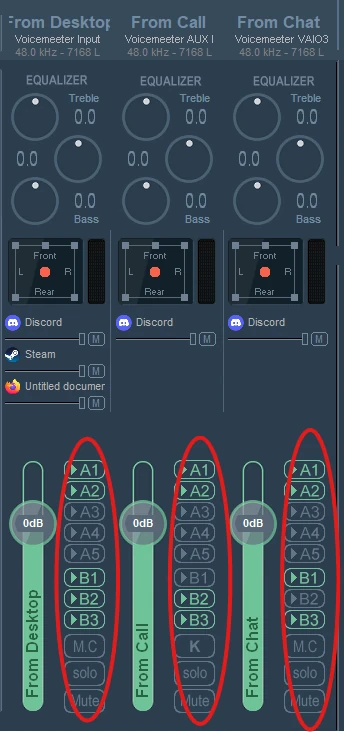
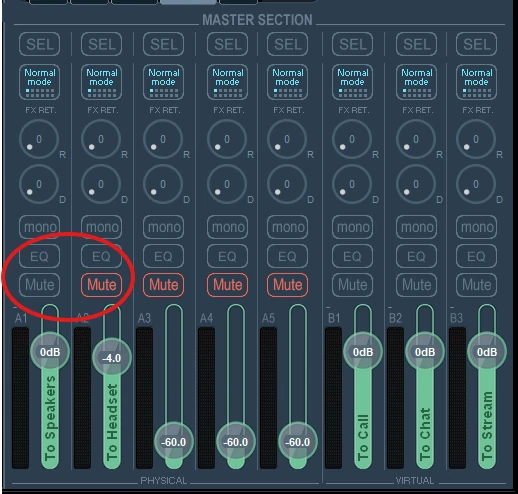
10) On Voicemeeter set your output mutes like this (sound will only play through the speakers):
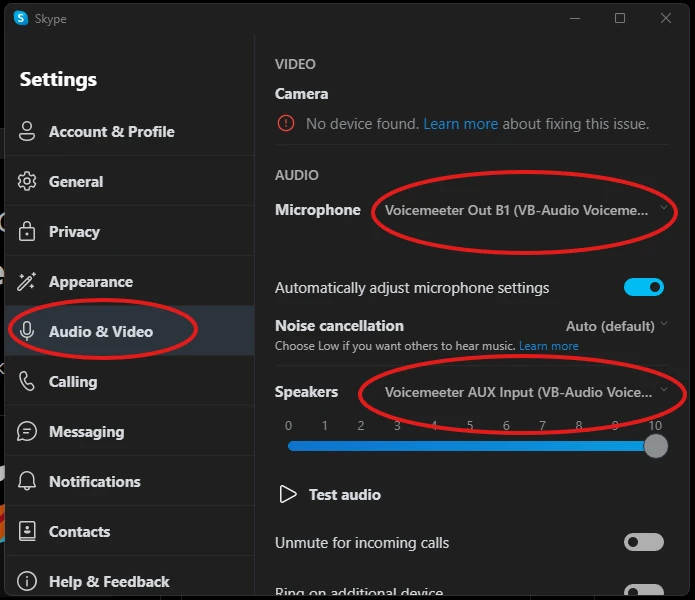
11) Set your call machine to the correct input and output:
Note: I am using skype. If you are not, you will still use the same input and output, but you will have a different UI than I show.
12) Set your Broadcaster to use the correct input and output:
Note: I am using Rocket Broadcaster. If you are not, you will still use the same input and output, but you will have a different UI than I show.
You will want to set the stream to broadcast Voicemeeter Out B3
Note: You want to make sure that is the only audio source for your broadcaster. If there are any additional inputs, you will have doubling of your audio.
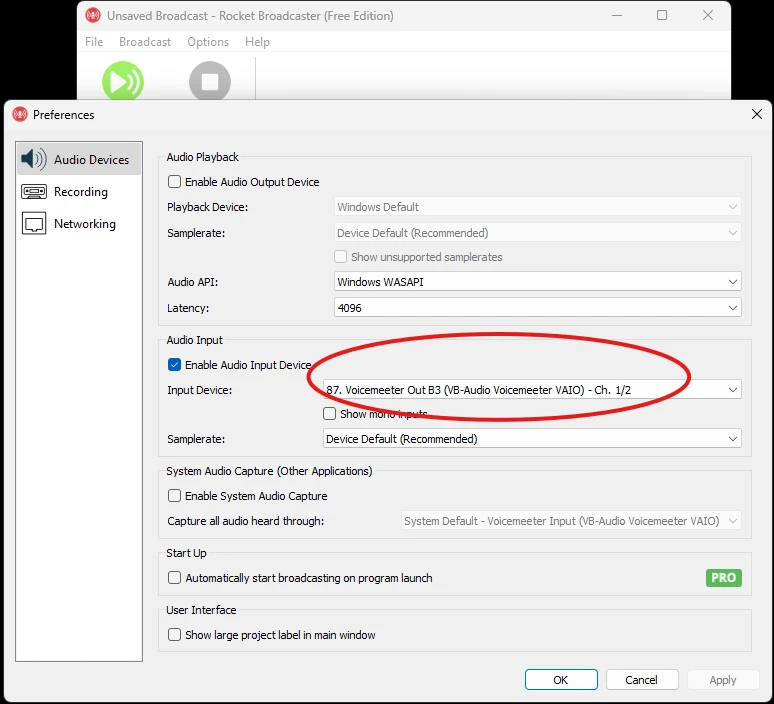
If you are using another program to record your stream, set that program to record this same output (Voicemeeter Out B3).
13) Set your chat machine to the correct input and output:
Note: I will be showing how to setup Discord, but the same input and output can be set for other chat programs like Mumble. However, you will only be able to use one of the chats at a time. (Ex: If you open Mumble and Discord, both chats will be able to hear you and the caller, but they will not be able to hear each other)
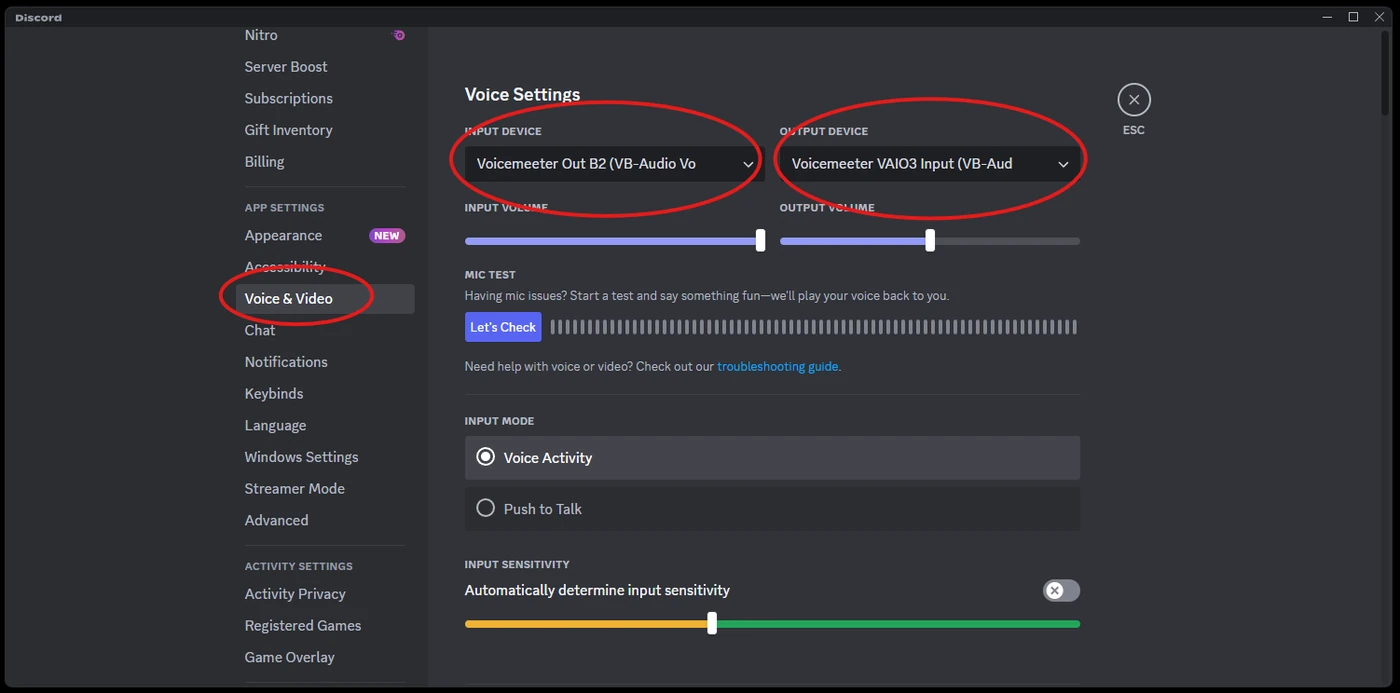
14) That’s it! Easy, huh? Now you can have a chat room that can hear your music and make calls with you. The caller will also hear your music and browser sounds (sound boards) with this setting, so keep that in mind.
It didn’t work? Then you skipped a step or set something incorrectly. Go back through each step and make sure that you selected all the right options.
2. Understanding Voicemeeter
A. Inputs
Voicemeeter Inputs are the sounds that are coming into Voicemeeter. Examples of typical inputs would be microphones and the sounds coming from your machines (dialer, chat, soundboards, etc). You can use Voicemeeter to combine these Inputs to form different Outputs (covered next) [example: You can combine your mic and the sounds from chat to send to the call. That way the call can hear you and your chat machine at the same time.]
Physical and Digital Inputs
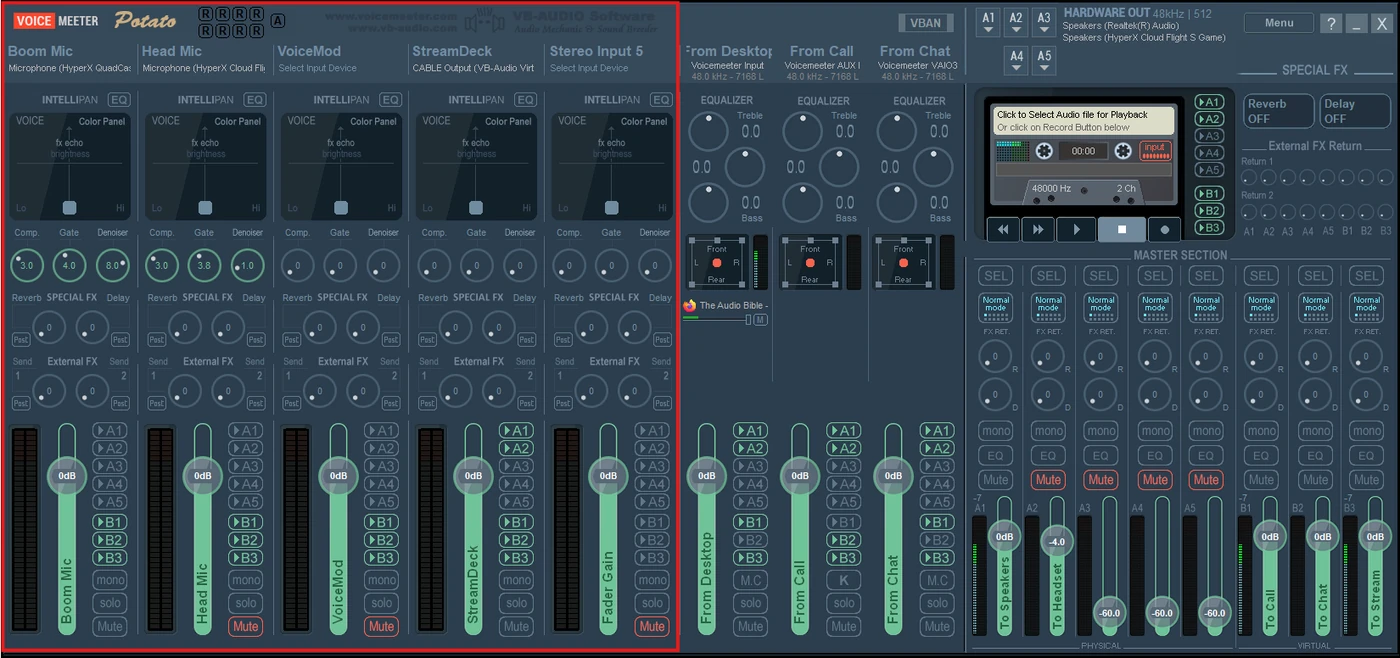
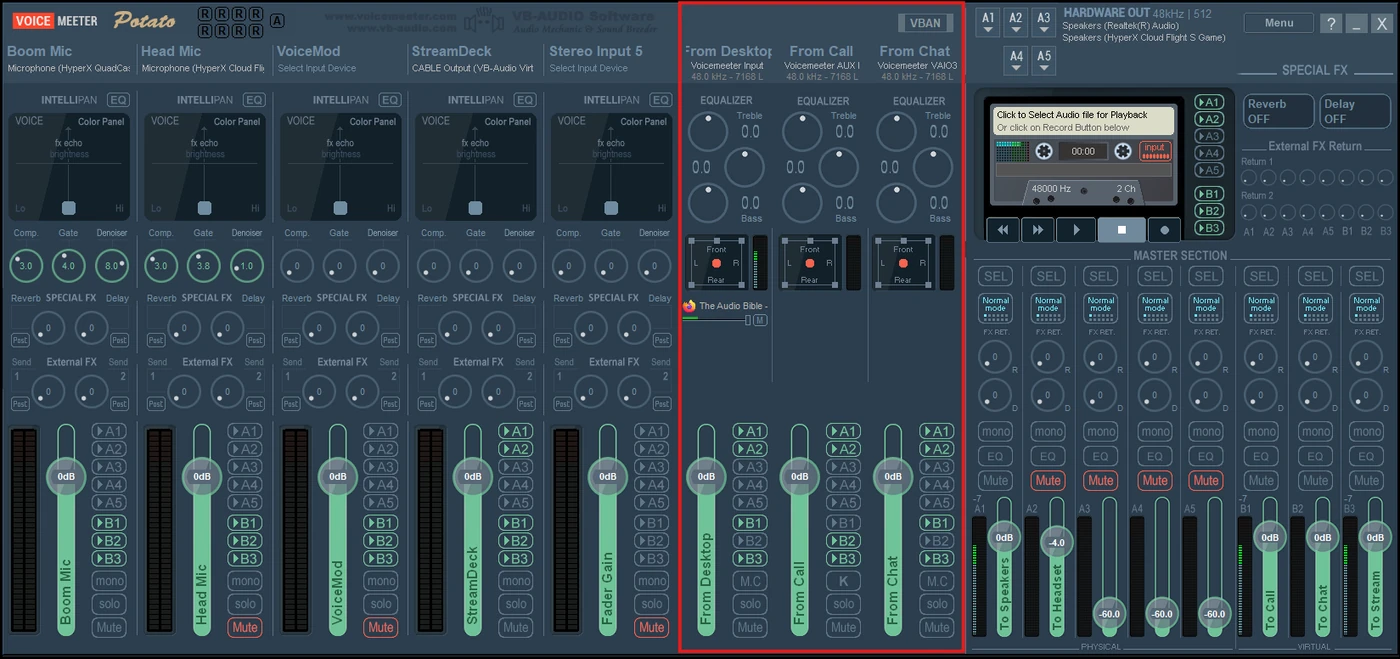
If you are using Voicemeeter Potato, then you will have 5 physical inputs and 3 digital inputs.
The 5 physical inputs:
The 3 digital inputs:
a. Physical Inputs
The physical inputs are typically the physical hardware you use and want mixed. As seen in the images, this is usually just microphones (there are two connected in the example images). See red circles:
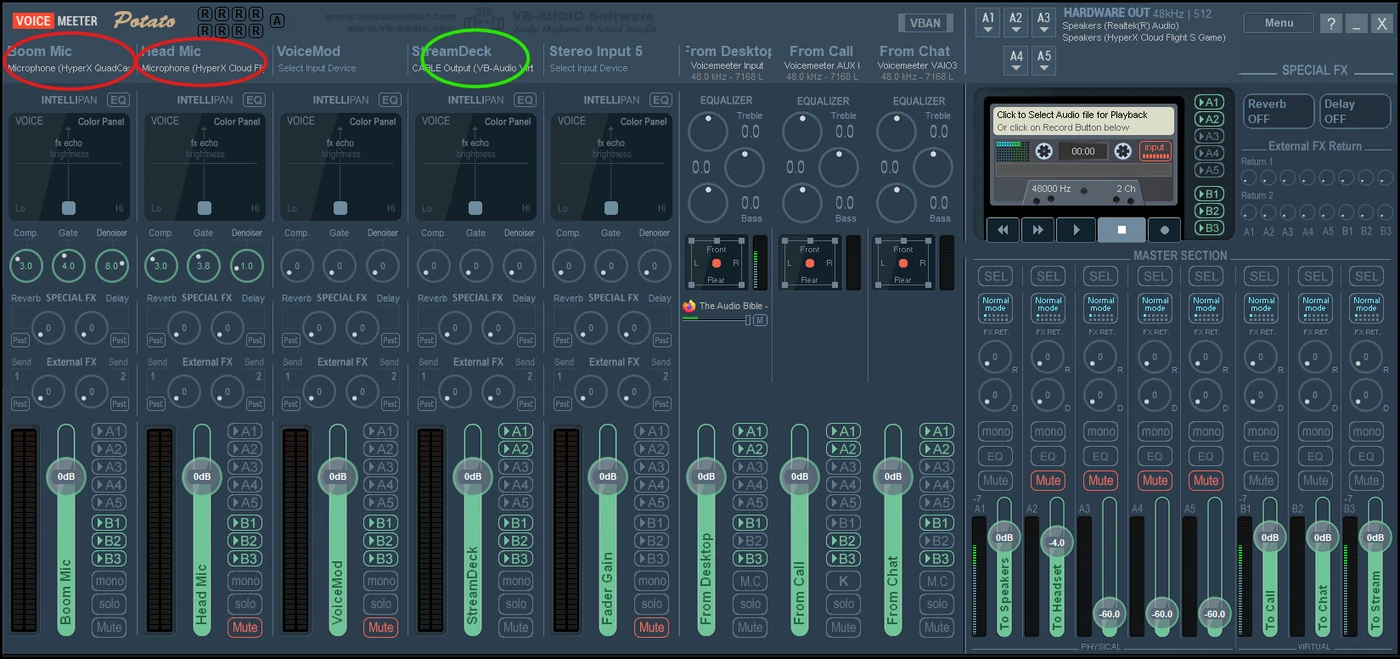
The green circle indicates a virtual cable that is being used for an input. Ignore that for now. It will be covered in the Cables section.
b. Digital Inputs
The digital inputs are the outputs from any programs running on the computer that you want to add to the mix. That means any programs that you have running on your computer that you may want to include in the stream/calls. In this guide, the three digital inputs are used for Windows default sounds (for browser soundboards and music), sounds from the call machine, and sounds from the chat machine.
The naming convention of the digital inputs is a little strange. This can make it hard to know which one to pick when you are selecting the output for your digital machines. So, here is a labeled picture to make it easier:
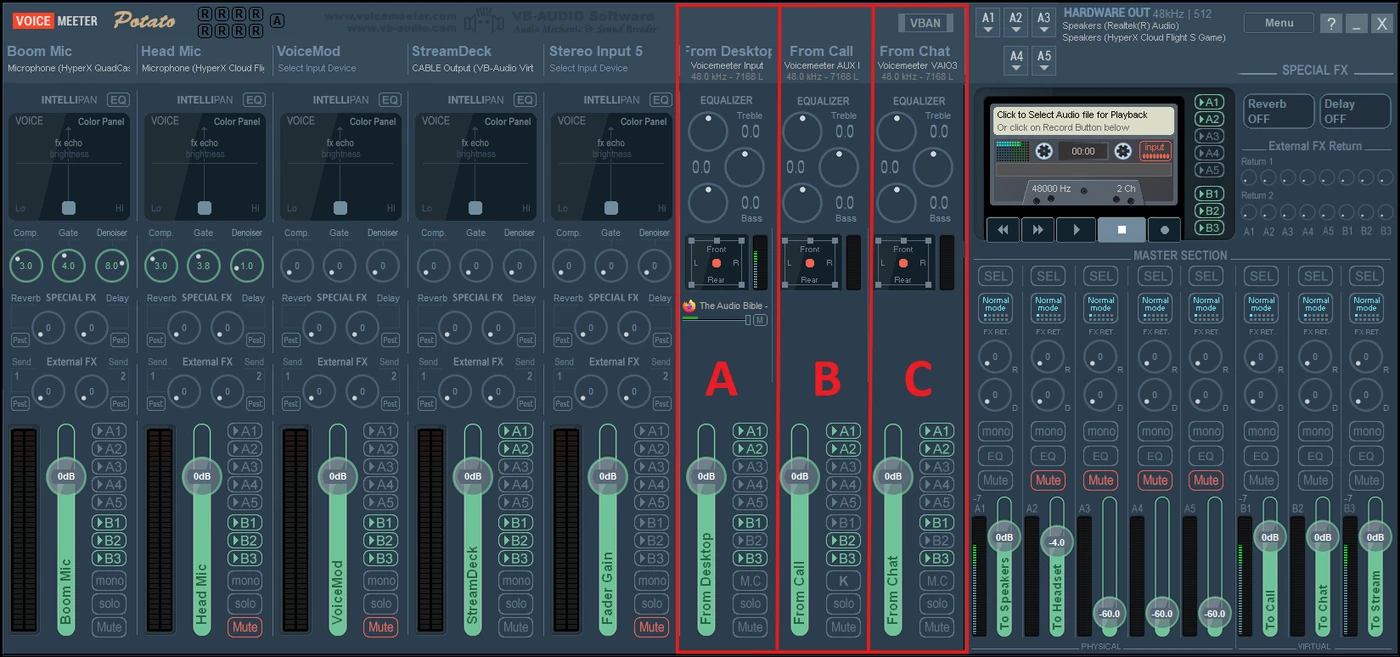
So, for example, if you want the sounds from your call to go to the second digital input, you would select Voicemeeter AUX Input as your speakers for your call machine.
B. Outputs
Voicemeeter Outputs are the sounds that will be going to the machines that need to hear them. In these examples, that includes speakers, headphones, call machine, chat machine, and stream machine/recording.
Physical and Digital Outputs
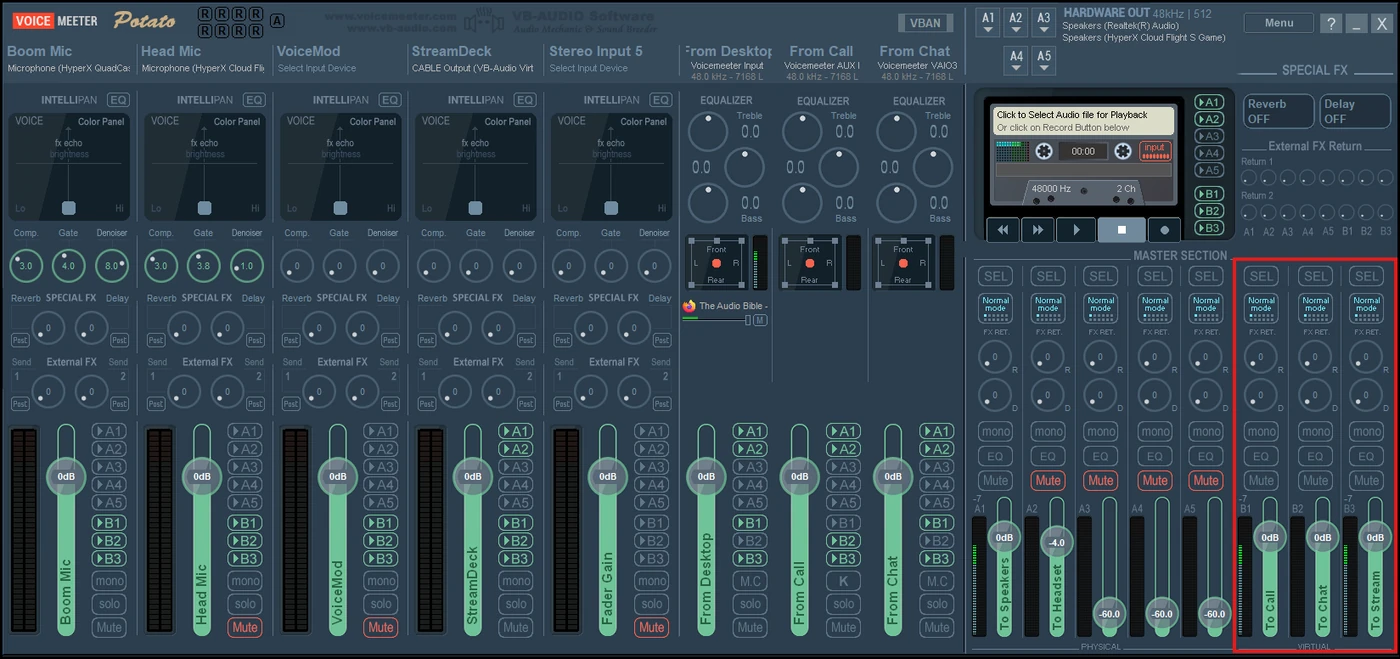
If you are using Voicemeeter Potato, then like the inputs, you will have 5 physical outputs and 3 digital outputs. The physical outputs are typically used for your physical hardware (speakers and headsets). These are set at the top of the Voicemeeter window (red circle in first image below). The digital outputs are used as the microphone/input for the other machines that need sounds (call machine, chat machine, stream, recording, etc.).
The 5 physical outputs:
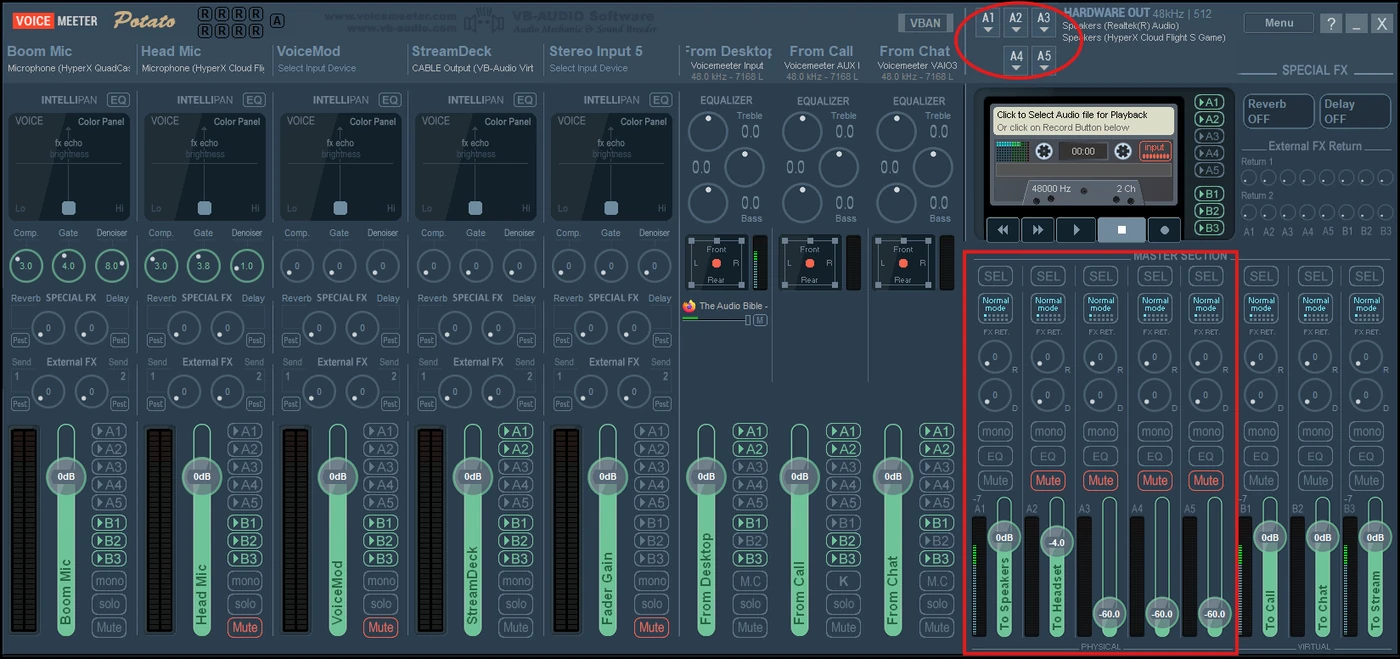
The 3 digital outputs:
a. Physical Outputs (A1 - A5)
The physical outputs are the A channels. On Voicemeeter Potato there are five physical oututs. The outputs are in numerical order from left to right and they correspond to the selections with the same labels at the top:
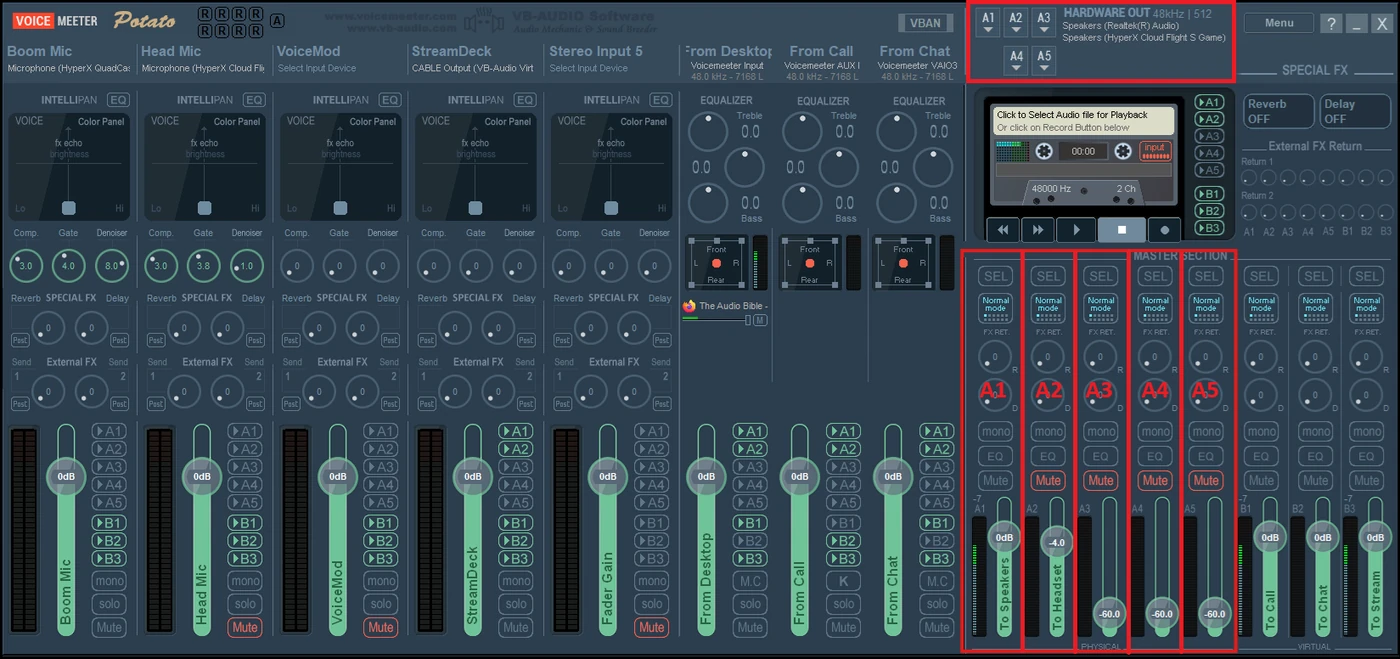
In the example above, only A1 and A2 are being used. A1 is set to speakers and A2 is set to headset. In this setup, one is kept muted so that the sounds are only coming out of one or the other.
b. Digital Outputs (B1 - B3)
The digital outputs are the B channels. On Voicemeeter Potato there are three digital outputs. These outputs are also in numerical order from left to right.
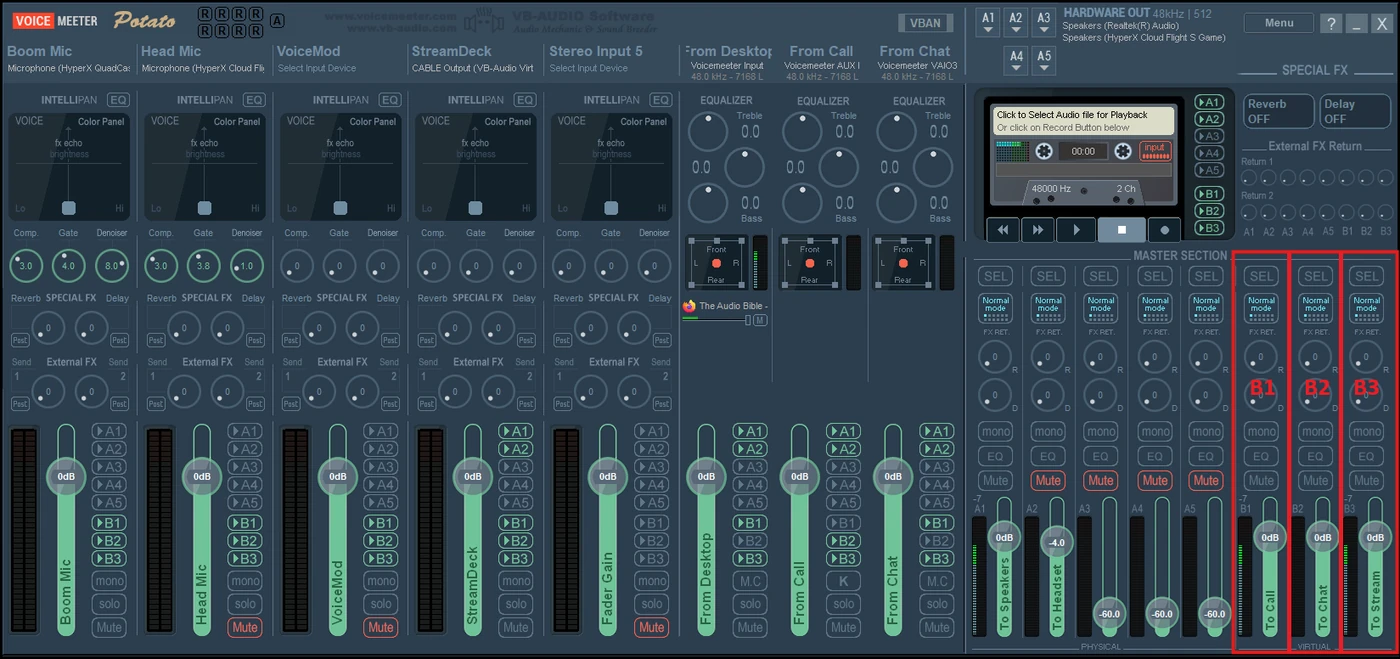
In the example above, Voicemeeter Out B1 is being used by the call machine, Voicemeeter Out B2 is being used by the chat machine, and Voicemeeter Out B3 is being used by the stream machine.
C. How to Mix
Okay, so how do you use the inputs to make different outputs?
This is done by selecting the output that each input should be sent to using the A1-5 and B1-3 buttons on each input:
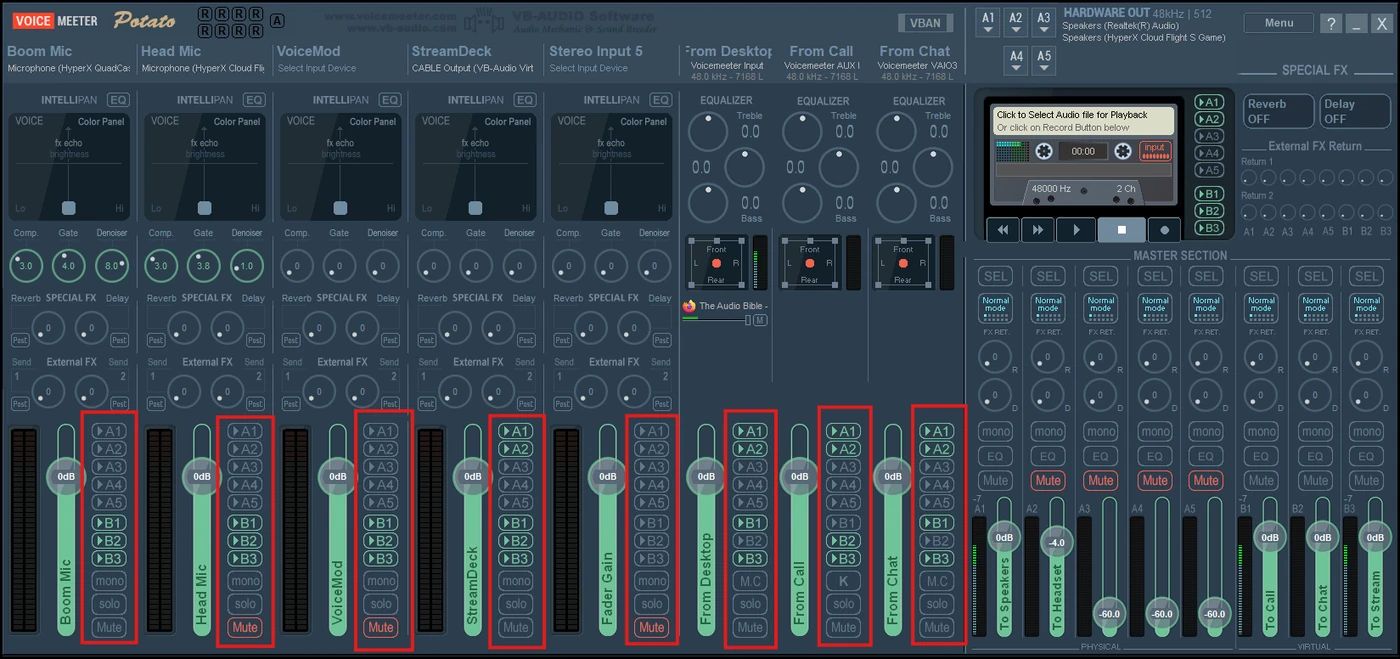
“But how!? WHAT DOES IT MEAN?!” Calm down. We’re getting there.
If you take the first physical input shown in the image below (labeled Boom Mic), you can see that it does not have any A channels selected, but has all three B channels selected:
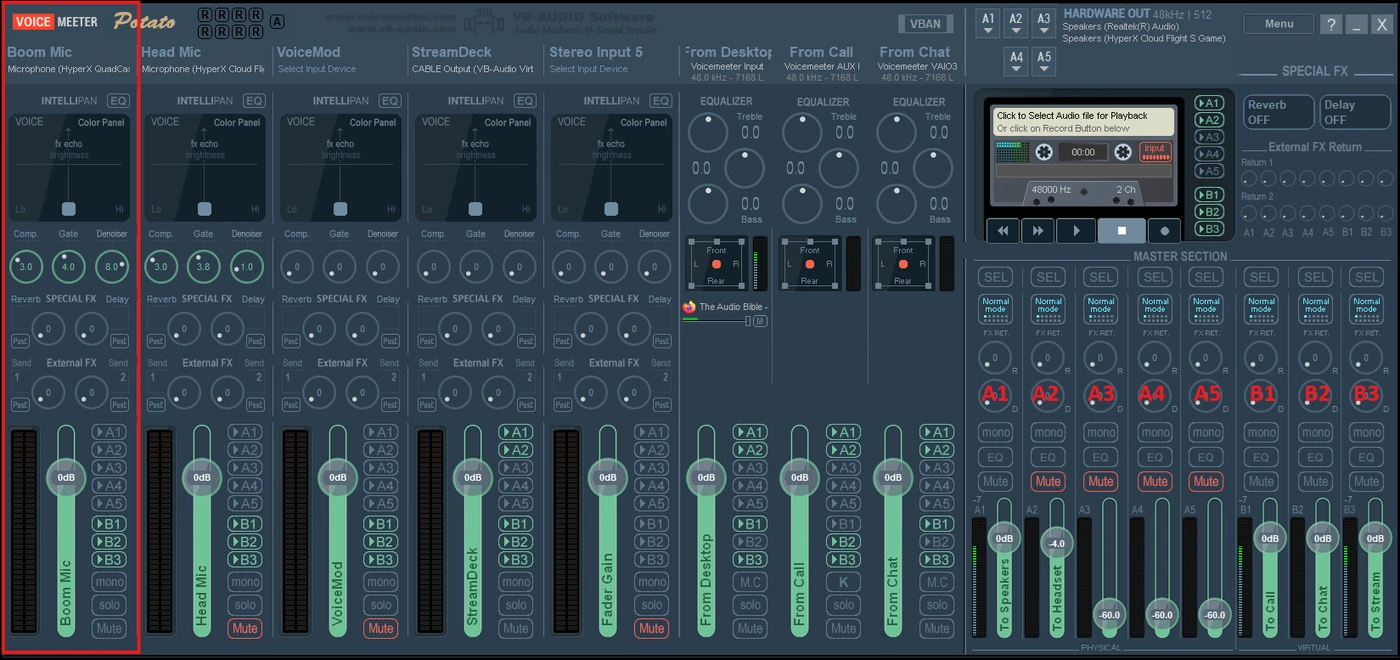
This is because you do not want (unless you are a psycho) your own voice to be played into your headphones (A2) or speakers (A1). However, you do want your call machine (B1), chat machine (B2), and stream machine (B3) to hear your voice.
Okay, that makes sense right? So now we get a little more complex.
We will look at the call machine input (Voicemeeter AUX Input) next. These are the sounds that are coming from the call machine. So, we do want to hear that in our headset/speakers. We do want the chat machine and the stream machine to hear these sounds too. We do NOT want to send the sounds from the call machine back to the call machine though. That will make the person on the line hear themselves.
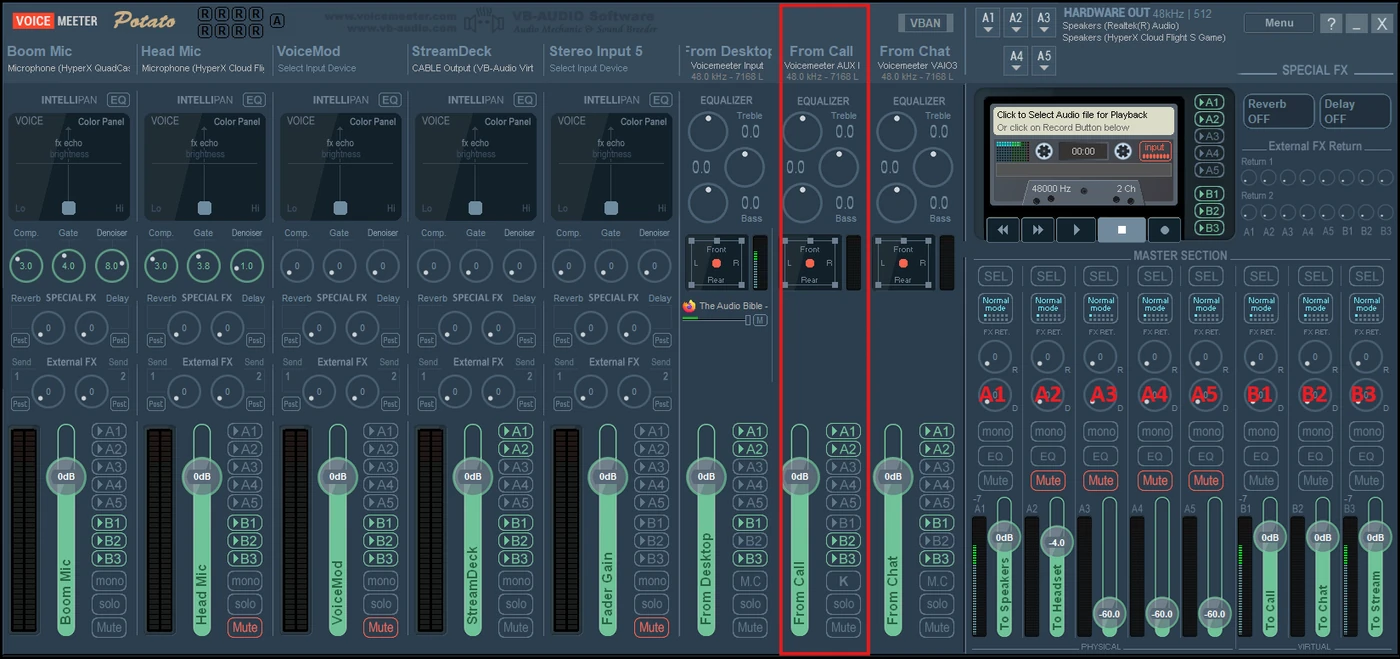
Because we want to hear the sounds in our headset/speakers we select A1 and A2. Because we want to send the sounds to the chat machine (so chat can hear the call) and to the stream machine (so the stream can hear the call) we select B2 (to chat) and B3 (to stream). However, B1 is the sounds going to the call machine, so we do not select B1, because we do not want the call to hear itself.
Okay, does that still make sense? Then let's look at the chat machine input last to be sure it clicks.
The selections for the chat machine are similar to the call machine, with one difference, we do want to send the sounds to the call and we don’t want to send the sounds to the chat. Because we don’t want chat to hear themselves.
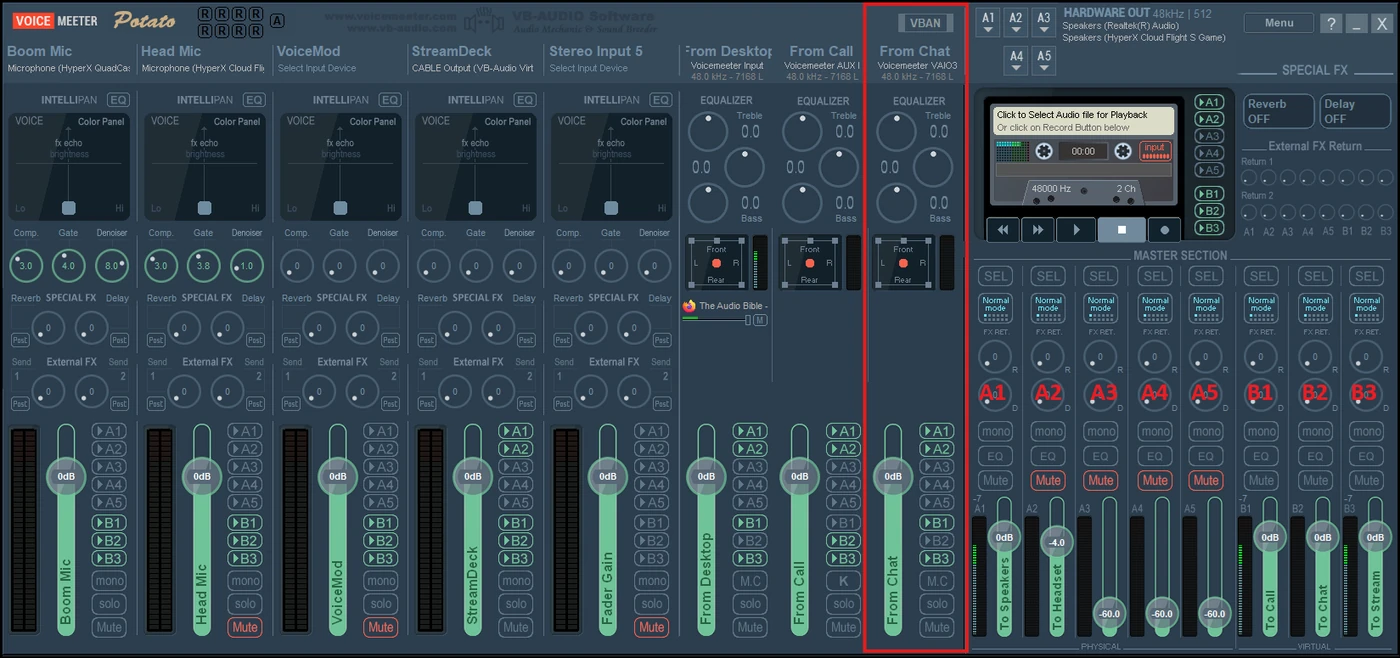
In the example above, the chat machine input has A1 and A2 selected so that we hear it in our headset/speakers. It also has B1 (to call) and B3 (to stream) selected because we want for the call to hear chat and we want the stream to hear chat. We do NOT have B2 selected because we do not want to send the sounds from chat back to chat (B2).
Clear as mud right?
3. Virtual Cables
Voicemeeter offers one free virtual cable as well as some purchasable cables.
What is a virtual cable?
A virtual cable allows you to treat a digital source as a physical one. In the example below, you can see that the 4th physical input is set to a virtual cable.
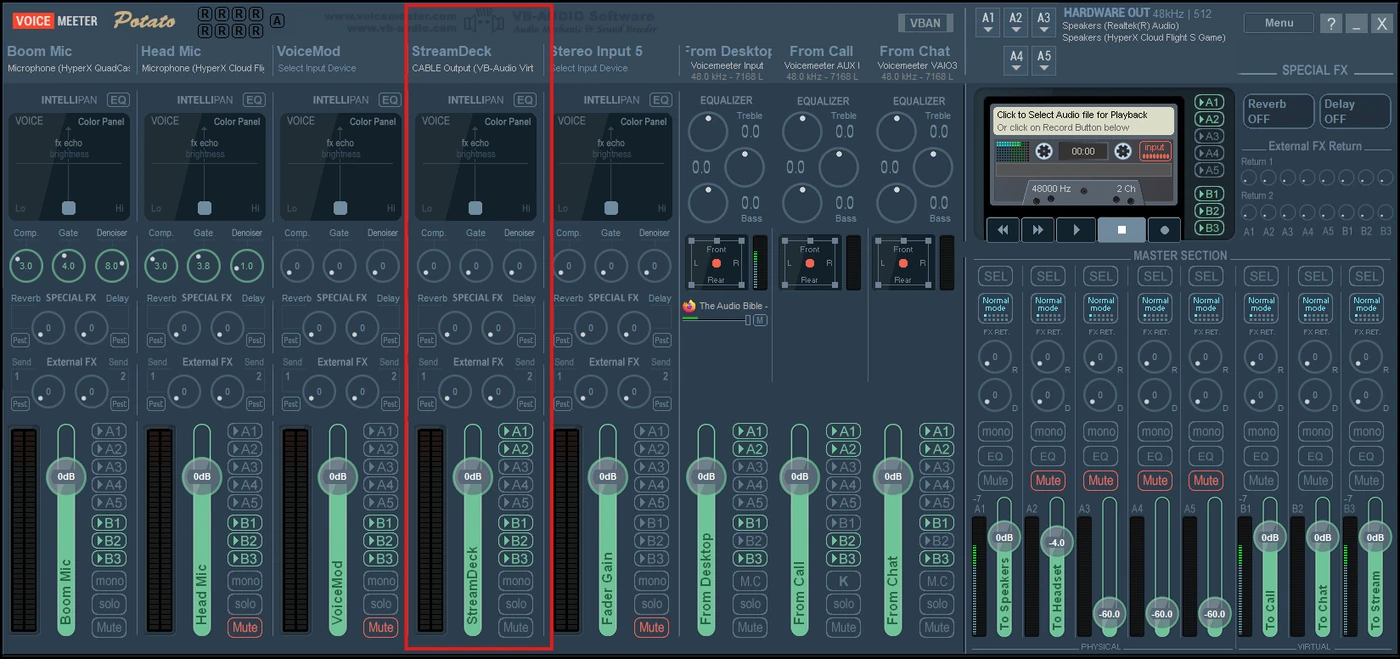
Why would you want to do this? It gives you more flexibility to separate your audio sources. Voicemeeter Potato has 5 physical inputs and 3 digital inputs, so if you want to have 4 separate digital inputs, you can set one of the physical inputs to a cable and then set that same cable as the output for the digital source that you want to use.
In the image above, the cable is being used by soundboards running on a stream deck. So all the soundboards being controlled by the stream deck are set to play on the cable. The “other end” of the cable is attached to voicemeeter as a physical input. So, the sounds from the soundboards come in on their own “physical” input. That enables music to be played from the Desktop audio (Voicemeeter Input) and have its own independent volume. Adjusting the volume of the music will not adjust the volume of the soundboards and vice versa.
You could also use it to separate chat groups. If you wanted to be able to have guests in two different chat machines (ex: both discord and mumble) at the same time, you could use virtual cables to accomplish that.
You could also use it for outputs. For example, you could set a cable to one of the physical outputs and send that to some other machine. Maybe you want to have 4 digital outputs for call, chat, stream, and recording separately. Maybe you want to be able to mute things to the stream, but still have it get recorded. In that case, you could set one of the unused A channels (A3-5 in these images) to the cable and then use that on the recording machine.
4. Voicemeeter Tips:
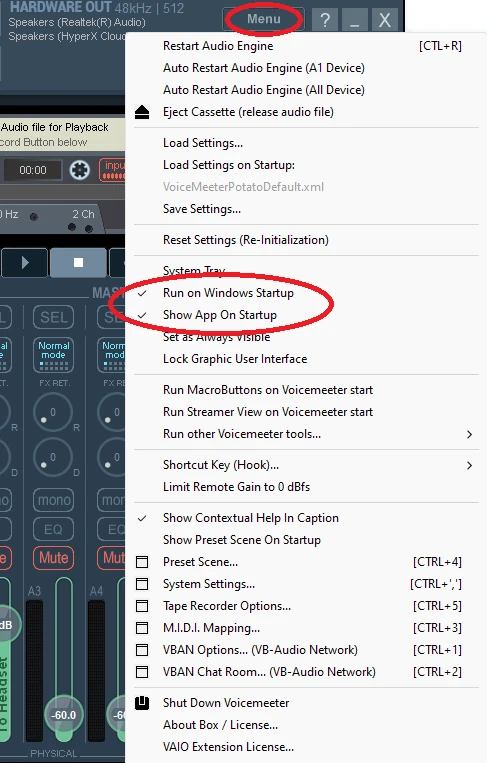
- To have voicemeeter start up automatically with Windows and show, select these options under the Voicemeeter Menu:
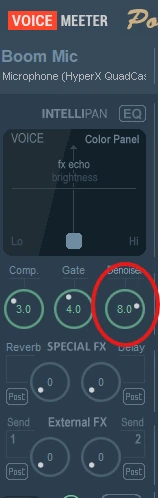
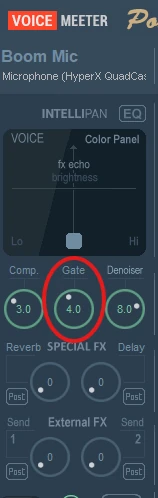
- Lots of line noise (background fuzz) coming from your mic?
Try increasing the denoiser on your mic settings
- Your mic is picking up EVERYTHING now? (background noise/typing/clicking)
Try increasing the gate on your mic settings
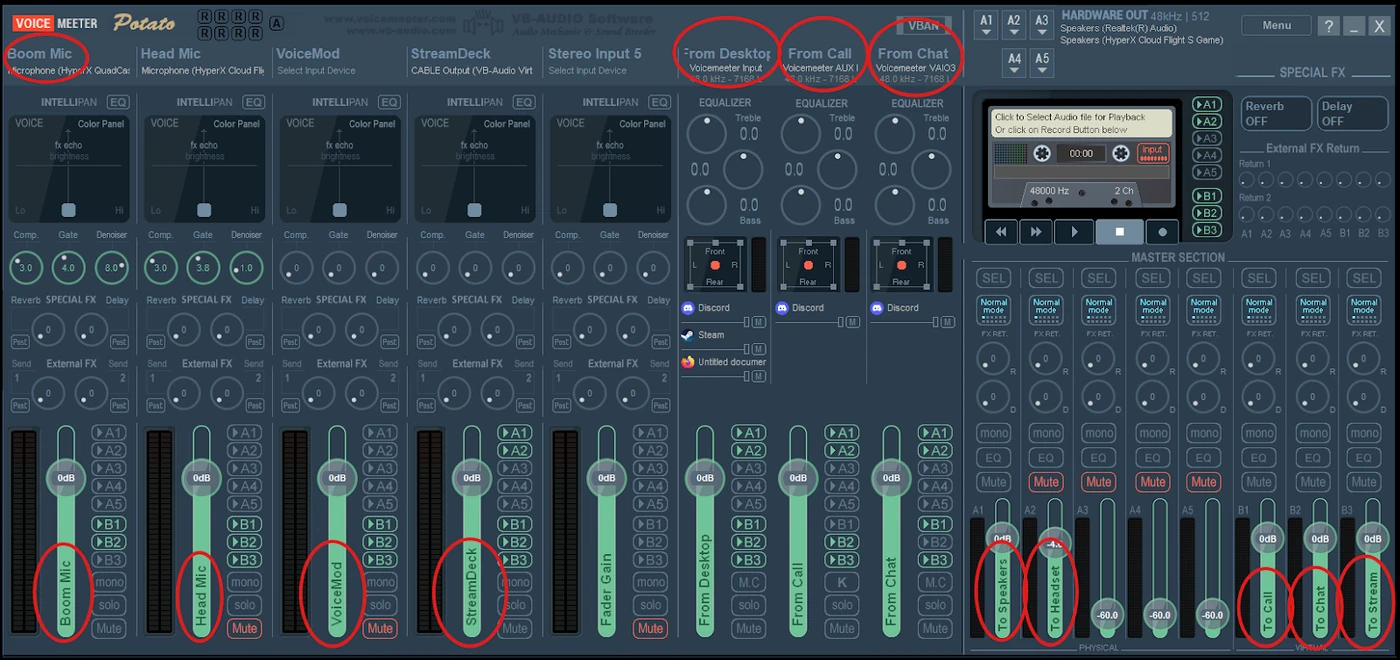
- You want to label your inputs and outputs like mine?
Right click on the names to rename them
More from the Zoo Crew
Video Tutorials
Want to see it done instead of reading about it? These tutorials from The Chill with IceCat on YouTube cover Voicemeeter, soundboards, editing your show and stream graphics.